Panopto sub-page navigation:
Making your 1st Panopto Recording
These instructions will help you make your first recording in Panopto. Although, if you prefer to use other recording software (like Quicktime Player or OBS) that's fine, too. Just make your audio/video/screen recordings, using whichever method of your choosing, then upload them into Panopto for easy editing, sharing, tracking, and management.
Considerations before pressing Record
Before you record anything, consider your recording plan and environment.
- If you're recording a lecture while face-to-face with your students, the set up is straightforward, since you know the location and how long the live session will be.
- If you're moving a course online, recording standard lecture-length talks of 50-75 minutes is not the most effective approach. Research shows that students rarely watch more than 7 minutes of consecutive video, so consider whether you can break your content into smaller chunks and present it this way.
In either case, consider the microphone that you'll be using and the ambient sound of the recording location. The microphones built into most laptops are not very good, especially if you're not sitting directly infront of the laptop. If possible, do a test recording and listen with headphones. Almost any plug-in USB microphone will give you better quality than a laptop microphone. If you're recording from home, a USB headset can be a great option.
Making Your First Recording
NOTE: Make sure you've activated Panopto in your Canvas course. Here are instructions on how to do that.
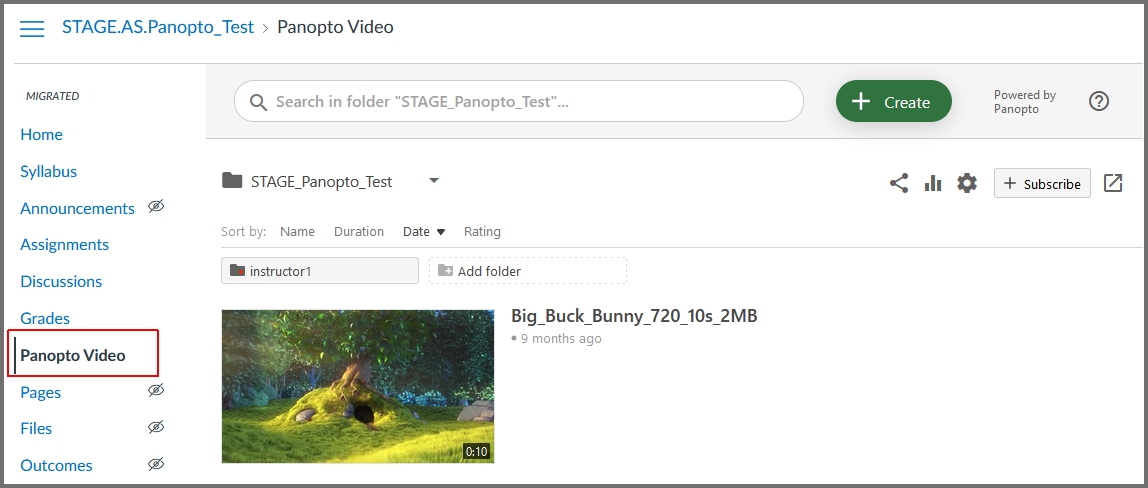
Start from Canvas
Navigate into your Canvas course and click on Panopto Video from the Course Menu on the left. The large green "Create" button allows you to create or upload recordings into Panopto:
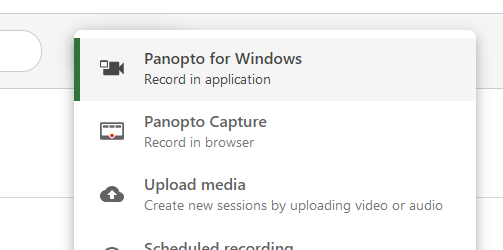
Choose one of the 3 Methods of Creation:
Panopto Desktop Client
To make a recording with the fully featured Panopto software, choose Record A New Session
The following instructions from Panopto's support page does an excellent job with how to create your first video using the Desktop Client: https://support.panopto.com/s/getting-started-video?topic=Record+A+Video
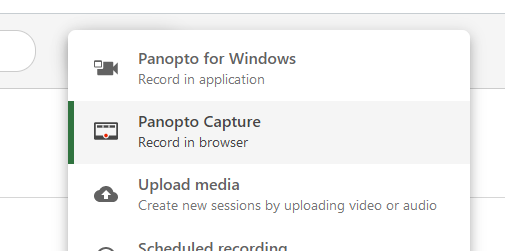
Panopto Capture Web App
To make a recording with the browser based recorder, choose Panopto Capture.
The following instructions from Panopto's support page does an excellent job with how to create your first video using the Web App called Panopto Capture: https://support.panopto.com/s/article/How-to-Create-a-Video-Using-Panopto-Capture
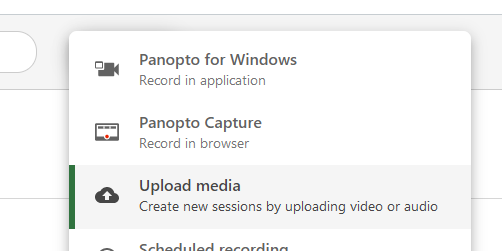
Upload Existing Video
To upload an existing video, click on Create and choose Upload Media
When prompted, select your existing media you want to upload.
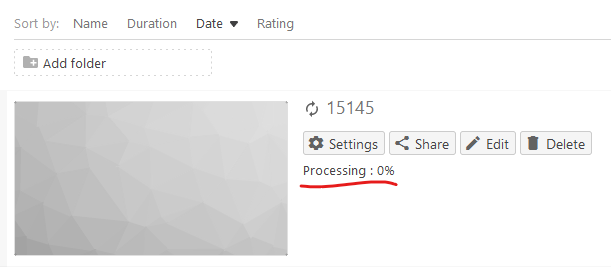
Once uploading has begun, you will notice a progress bar.
NOTE: Video files can be quite large and the wait time could take up to 20 or more minutes, depending on your internet speed. If you are sharing the bandwidth at your home, kindly ask your household to refrain from uploading, downloading, or streaming while you are uploading your video to help decrease wait time.
After upload is complete, you will see the new video appear in the Panopto Recordings page in your Canvas course. You will notice yet another progress bar that shows that the video is being converted to the correct format by Panopto's servers.
Once processing is complete, you can then Edit your video, adjust any Settings, and/or integrate it with our course.